about shop contact sponosr home
Showing posts with label diy. Show all posts

Thursday, November 1, 2012

Mighty Morphin Power Rangers!

I only had one costume this year...but it was pretty awesome.  I was the Yellow Power Ranger from Mighty Morphin Power Rangers!  The idea was originally created for a group of us to wear in a Halloween bike ride and then I reused my costume again for a Halloween party later in the month. 

We all bought spandex body suits and then heat-pressed the vinyl diamonds on ourselves. The Yellow Power Ranger doesn't have a skirt like the Pink Power Ranger because she was originally a male character in the Japanese show, so I hunted down some yellow shorts so I didn't feel so exposed.  Unfortunately, the males in our groups were not as concerned about that as me...so I apologize for the male bulge/s below. ;p

(I also apologize for the wide variety of sizes. I'm pulling these image from a lot of different sources and am being a lazy blogger and not making them all the same size)


Please note my one finger that is exposed so I could use my phone. haha
 
 
Then I just removed that glove completely so I could eat food without it getting all gross. yeah-classy!


Monday, April 23, 2012

Mason Jar Competition

During the vintage event, Salvage, there was also a mason jar competition. You could do anything you wanted, as long as a mason jar was incorporated. I decided to do my own take on potpourri and how to display it. I found everything in or around my home--everything but the mason jar. I only had jars without lids, so I purchased that one new.  Once everything was painted I soaked all the bits and pieces in an apple cinnamon scent and punched holes in the top of the lid.  

I unfortunately didn't come home with a ribbon [I wish I had made a sign so people knew to smell it], but I'm still really happy with it and it's proudly displayed in my room now. :D


Friday, October 28, 2011

Sugar Skull Makeup Tutorial Guest Post by Danielle of Ghost Waltz


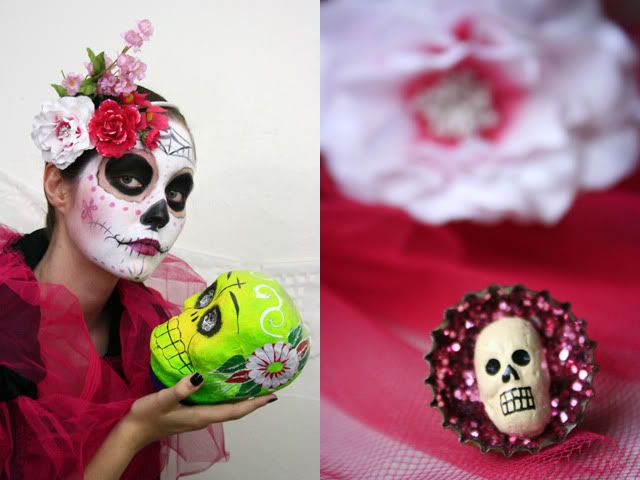
Hi there, I'm Danielle from Ghosts Waltz, and I'm so pleased to be guest posting on Mary's wonderful blog. I love to go all out for Halloween, but once the trick-or-treating has come to an end, I also like to dress up for los Días de los Muertos, or the Days of the Dead. This ritual began in ancient Mexico and is still celebrated in Mexico and parts of the U.S. From the night of October 31st through November 2nd, families visit the graves of loved ones, build altars, and celebrate life and death in a way that expresses both reverence and humor. One iconic image of this time is the sugar skull, a brightly colored candy skull, often decorated with icing and sequins.

Today I'll be showing you how to do sugar skull makeup. It can be as simple or as intricate as you like, so don't be intimidated! I will be doing one of the more basic looks, so you can add to it if you wish.


Once you have collected some images for inspiration from books or the internet, it's a good idea to sketch out what you want to do beforehand.


For this look, you will need sponges and a few brushes. I used a white character base, black creme liner, and a few colored creme liners (eyeshadow will work, but it won't pop as much). I would also suggest powder and puff to keep everything from running.


1. Paint the circular outline of the eye sockets, and outline the nose socket, then fill it in.
2. Sponge on the white base. Patting it on looks better than wiping it on. Leave room around the eye sockets for painting the petals.
3. Fill in the eye sockets with your choise of color. Paint small half-circles around the sockets for the petals.
4. Outline the sockets and petals with a dark color (I chose black) using a thin brush. Add lines to your mouth for teeth, and add any other facial details you like.
5. Powder! Apply powder to your face with a puff, then remove excess powder with a damp paper towel. Add paint to any parts of the makeup that have lightened.
6. If you want to add sparklies, do so with spirit gum or eyelash adhesive (I didn't have enough so I went without). Accessorize with lots of flowers, and you're good to go!


Thanks to my husband Jose Rodriguez for taking the photos of me.

---------------------------------------------------------------------------------------
Mary: Danielle your makeup skills are always spot on! Plus all your photos are lovely. :D Thanks so much for this great tutorial

Monday, October 24, 2011

Bloody Garland Tutorial Guest Post by Rhiannon of Arts & Farts

Hello everyone! My name is Rhiannon and I run the blog Arts & Farts. My husband and I have gotten totally pumped on Halloween and have been making crafts since September! It seems like every week we’ve got a new project. Today I thought I'd share with you a tutorial for a garland I made. 

1.    Gather your supplies. You will need:
A sheet (or a few sheets, depending how long you'd like your garland to be) of sturdy red paper
A nimble pair of scissors
A small paint brush
Embroidery floss
A writing utensil
White craft paint
Scotch tape
Your blood drippings templates


To make your templates, you'll need a thick paper. I recycled an old spiral notebook cover for mine, but even just a nice sheet of cardstock will do. You can draw out your own drippings, or print the ones I made (Link: http://i.imgur.com/oyabs.jpg).


2. Trace the drippings on your red paper. Be sure to check for a texture on either side of the paper and do your tracing on the opposite side. The paper I picked up had some nice striations in it, but there are tons of really interesting kinds of paper at craft stores. I’d love to see this done on glittery paper.


3. Once you've think you've got enough, cut them out. This is a fairly lengthy process, what with all the curves, so I cut them out in blocks and then parked in front of a movie to work on the details.


4. When you're all done cutting, grab your white paint and paint brush to add lighting accents. This gives the drippings a more realistic feel. When you're doing this, keep an imaginary light source in mind, such as directly to your right.


5. Make sure to save your scraps! There should be lots of nice droplets in your leftovers that will be easy to refine into single shapes. These will make a nice addition to your garland.


6. Next, line up all your drippings on a hard floor or long table. Space them out evenly to get a feel for how long your garland needs to be. Once everything is in order, stretch out your embroidery floss all the way across the top of your drippings and tape it down at each end, being sure to leave an extra 5 inches of string on both sides.


7. When everything looks orderly, flip each dripping piece over and tape it to the garland. This may require cutting and shaping your pieces of tape here and there. It also may require shooing away any pets who like string.


8. After you've got all the big drippings taped onto the embroidery floss, tie on a few extra strings between the drippings. I found it was easiest to tie the string with a little tail, and then snip off the tail once I was sure the knot was secure. On the bottoms of these tails, as well as the tails you left when you first taped down your embroidery floss, tape on some of the single droplets.


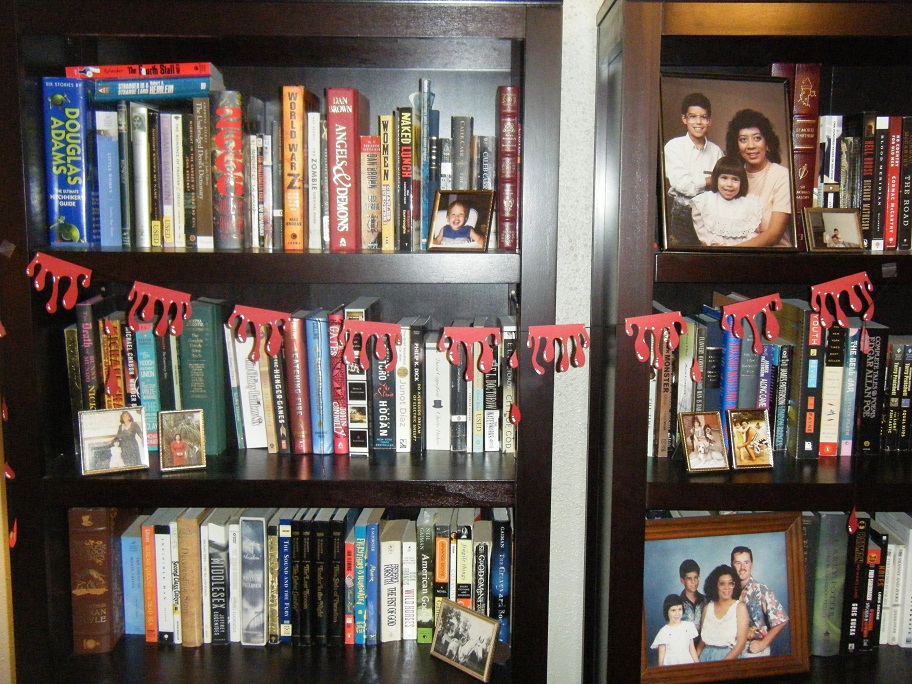
9. Once you've got all your droplets square away, you're all done! I hung my garland between two book shelves in my living room, but I think one would look great on the edge of a table at a Halloween party, or lining a wall just where it meets the ceiling in a spooky room!

Thanks so much for taking a look at my tutorial. If anyone decides to make one of these garlands, please take a photo and send it my way! I'd love to see what you've done with the project to make it your own.


--------------------------------------------------------------------------

Mary: Rhiannon--this creepy garland came out great! I love the added details of the white craft paint--really brings shape the blood. :D Thanks so much for sharing this DIY with all of us today

Friday, October 21, 2011

DIY Glitter Pumpkin Wall Hanging Guest Post by Katie of Running With A Glue Gun

Hi Everybody! I'm Katie from Running With A Glue Gun and I'm so happy to be guest blogging at Mary Rebecca. One of my favorite things about October is decorating and of course all the pumpkins. So today I'm going to share with you guys, how to make a Glitter Pumpkin Wall Hanging.


Supplies
Halloween scrapbooking paper
Fake pumpkin
Picture frame
Foam brush
Scissors
Craft knife
Mod Podge
Glitter
Ribbon, buttons etc.
Hot glue gun ( not pictured) 


Step 1: Cut your pumpkin in half, I use a craft knife to cut mine in half but you could use a sharp knife, plastic knife or if you really wanted to get into it a saw. It will really depend on how your pumpkin is made, luckily my pumpkin was Styrofoam so it was easy to cut ( I got my pumpkin from Big Lots). You will really have to experiment to see what works best for you. 

Step 2: Then take one half of your pumpkin and cover it in Mod Podge ( picture 1), then dump a ton of orange glitter on top ( picture 2). Once your pumpkin in covered in glitter, set it aside to dry. 

Step 3: While your pumpkin is drying, take the glass out of your frame and cut a piece of scrapbooking paper to go inside your frame. 

Step 4: When your pumpkin is dry, take your hot glue gun and apply some glue to the back of your pumpkin. Then adhere it to your scrapbooking paper thats in your frame (picture 1). 

Now you could stop their but I added a little spider in the corner of my frame ( picture 2).

Then your ready to set it up or hang it on your wall!


----------------------------------------------------------------------------


Mary: Katie, this DIY is too cute! I love your little added bonus of the tiny spider :D
Thanks so much for sharing

DIY Mug Shot Nameplate Guest Post by Brandy of brandy-son Zen master flash

Hi, My name is Brandy and I write for my silly blog, brandy-son Zen master flash. Here is an incredibly easy DIY on making your own mug shot for your Halloween costume or just-for-fun.


Materials:
Glitter foam (it doesn't have to be glitter)
Glitter foam adhesive back alphabet letters or numbers (I bought the combo pack)
Scissors
Yarn
Hole punch


How To:
1. Decide what you want your nameplate to say. I chose a series of numbers so I could reuse mine for multiple costume ideas. I've seen mug shot nameplates both ways. There were a million celebrity and reality TV stars names that I came up with that I thought would be fun to use.
2. Take your black foam and cut a few inches off of the bottom of the widest side of one piece.
3. Hole punch the top corner on both ends. My foam has an adhesive back but I opted not to peel the backing off from it; keeps it sturdy.
4. Peel off the back of each white foam letter or numbers you chose and start sticking them to the black foam. I thought I would need to use glue for extra support but it turned out that my numbers were sticky enough.

5. Cut a length of yarn that would fit over your head.

6.Tie each ends of the yarn to the holes you punched through the black foam.


7. Viola! You are finished with your customized mug shot nameplate and ready to add it to your Halloween costume.


As you can see this is really easy and there a ton of ideas that you could do to make it your own. T
Thanks for reading!
-Brandy


------------------------------------------------------------------


Mary: What a simpler but great way to add something extra to your costume! I'm still stumped on what I'll be this year, but maybe I'll whip one of these up to help with whatever I come up with. :D

LinkWithin

Related Posts Plugin for WordPress, Blogger...